If you need to upgrade your Windows server, you need to keep in mind it is not a simple process, and it requires thorough server migration planning. There are many things to consider and steps to follow for the migration to run smoothly. Before you begin, take a look at these steps to help you along the way and make sure you are fully prepared.
Migrations Take Time
From the stability of the original server or any other unforeseeable event, countless factors can take a typical server migration from just a few days to weeks. It is important to consider that the migration would take a couple of weeks.
We suggest that you refrain from making configuration changes to the original server once the backup has started. You can migrate website, database, and email data, but some other configuration such as IIS cannot.
Pro tip: Create a pre-migration form containing all the items that are crucial to the migration process.
Testing is Crucial
As there are many differences between each server, it is not possible to guarantee the functionality of each of them. Given the complexity involved, you have to check that all items work correctly before the destination server is live. Investigate any issues that appear during the testing phase of the migration.
Before the Migration
Before your migration begins, you should delete email, site data, or databases and any other unnecessary information from the database. The less data you have to migrate, the less time it will take to finish the migration.
If you are moving to new IP addresses, be sure to lower the TTLs on your Domain’s DNS. As DNS takes some time to propagate, you will bring your new server to live faster if you reduce TTL values. Bear in mind that your current TTL values may be restored after the migration is complete.
During the Migration
As explained by MSSQLTips.com, these are the steps you should go through to carry out a successful migration.
- Stop the application service
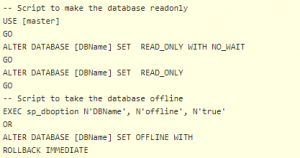
- Turn the database read-only (Optional)

- Take the latest backup of all the databases involved in migration
- Restore the databases on the target server on the appropriate drives
- Cross check the database properties as per the database property script output
- Change the database properties as per the pre-migration checklist
- Execute the output of Login transfer script on the target server, to create logins on the target server
- Check for Orphan Users and Fix Orphan Users
-
Execute DBCC UPDATEUSAGE on the restored database.
Run the DBCC UPDATEUSAGE command against the migrated database when upgrading to a newer version of SQL Server.

- Update index statistics
- Recompile procedures
- Start the application services, check the application functionality and check the Windows event logs.
- Check the SQL Server Error Log for login failures and other errors
- Once the application team confirms that application is running fine, take the databases offline on the source server or make them read-only.

Final Sync
After testing sites and applications on the new server and if no errors are found, you should schedule the DNS update or IP swap as well as the final data sync. At the same time, the last sync will be carried out, by copying website content, data, and mail. You should only synchronize content that is newer than the initial migration.
Contact Soaring Eagle Consulting for a Free Database Evaluation Today
Getting started is simple. Click the button below to request your free one-hour database assessment from the DBA experts at Soaring Eagle Consulting®.


